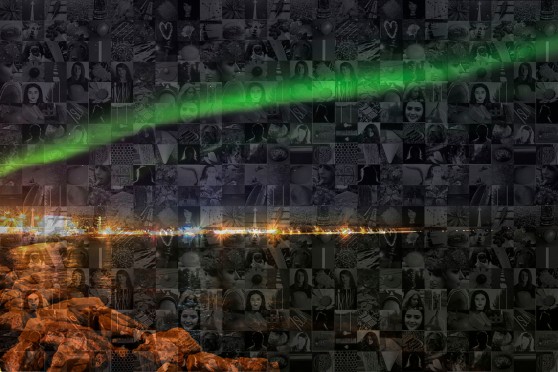
This week I finally completed my final image, using a combination of my northern lights shoot and my collage of photographs that I took over the course of my time as a photographer at this college. I am very happy with my final image, and am excited to display it in the exhibition. I also confirmed the job role I will have in the exhibition. It is ‘Food and Drink’, and I am required to supply sustenance at the exhibition at the end of the month.
Weekly Reflective Journal 9
This week I did two more experimental shoots, again, one technical and one conceptual. I also began collecting the images needed to make the collage in my final image, using websites and blogs that I have uploaded photography work to over the past few years in college.
Weekly Reflective Journal 8
I have completed all of my image bank solutions and around half of my artist responses. I have also completed all of the artist research I need in this unit, two of which were technical shoots by artists, and two of which were conceptual shoots by artists. All four of these artists and the specific shoots that I have written about relate to my Final Major Project.
Weekly Reflective Journal 7
This week I finally began my experimental shoots. My first shoot was a technical shoot, practising the photomosaic technique on Photoshop. The background image I used was the famous paining ‘The Scream’ – Edvard Munch. I was quite happy with this experiment, given that it fulfilled it’s purpose of a way of getting used to the method of creating photomosaics. The second experiment was a set of detailed instructions, showing how to create the photomosaic. Both of these shoots were technical shoots. I also added more to my artist research so far, and created one image bank solution using one of the artists I have researched so far.
Weekly Reflective Journal 6
This week I spent the majority of my college days and study time adapting and completing my brief, which explains my main interests and a few of my ideas over the course of the past few weeks in terms of what I will submit for my Final Major Project. I also completed some more artist research, thus completing my action plan for this particular week.
Weekly Reflective Journal 5
This week was my first week back since the Easter holidays and my Iceland exertion. I completed my project proposal finally, and began a large amount of research into how I can create my photomosaic on Photoshop. I found the information I collected very useful and I shall definitely use it to create my final image in the coming months.
Final Image
Artist Response
Eric Cahan:
“Majestic”:


Tom Hussey:
“Sad”:


Rain And Sad Photography Cool HD – RayaWallpaper.com

Young man praying to God during sunset by the sea

Image Based Solutions
Emma Biggs:


Robert Silvers:


")
Eric Cahan:


Church of St Primoz, Slovenia

Tom Hussey:


Conceptual Experimental Shoot 3
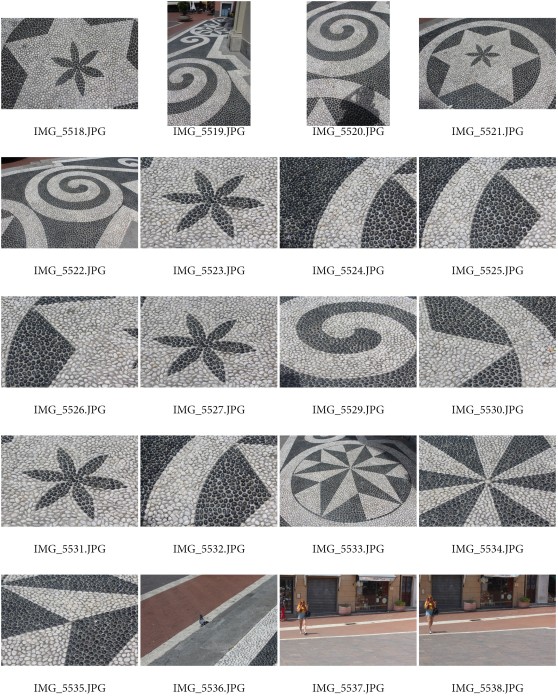


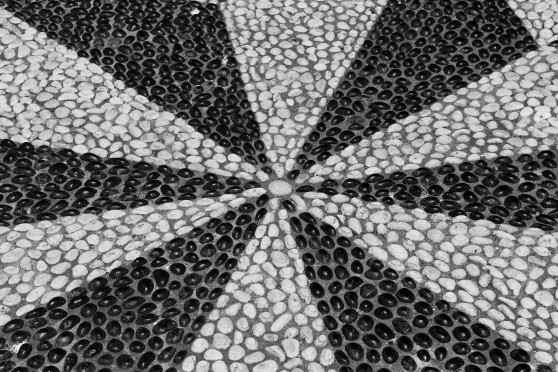
My sixth and final shoot took place in the city of Imperia, in the north of Italy. It is quite similar in style to my shoot around Harlow taking pictures of the various mosaics that I come across. However, these mosaics are much older, larger and have clearly had more time spent on them than the mosaic’s I found around Essex. Even after all this time of studying mosaics and photomosaics, I still find it fascinating when I see the intricate detail that goes into creating these pieces of art. The pebbles and stones used to create this large mosaic were all black or white, however, given that the mosaic was outside and had been around for a long period of time, some of the stones had mould or grass growing on them. I found this shoot could be compared to Emma Biggs project, where she created mosaics and photographed them. However, an obvious difference between our work is that I did not create these huge mosaics in Italy, I only photographed and uploaded them.
When editing my images, I thought of using the black and white filter on this whole shoot to get rid of all the stains and dirt marks found around the floor and walls of the buildings that featured the mosaics. I think this worked out quite well, given that the image now looks quite smooth and unblemished. The variety of shapes that I found on these buildings was extensive, as shown in the contact sheets above. Lines are very important in mosaics to distinguish individual shapes, and there are very clear and prominent lines in the majority of these images. As the lines spiral from outwards to in, your eyes are naturally drawn to the centre of the image. In the second image, the same effect is present, as with many of the other mosaic’s that I found at this particular location. I also considered tone when taking these photographs, given that the subject of the shoot was a black and white building and floor, and I think the various light and dark sections of the image are very noticeable, and I am pleased with the result. If I were to attempt this shoot again, I would instead shoot straight away with a black and white filter, as opposed to changing the colour and tones in the post production stage of this experimental shoot. However, I’m still content with the result of my shoot with the black and white photoshop filter, and really enjoyed taking these photographs.
